Loriot LoraWAN + Cellular Combo Connectivity
This guide explains how Tenant Owners can connect their thingsHub account to a Loriot Network Server to receive data from both LoRaWAN and Cellular Combo trackers. The Loriot Network Server is a LoRaWAN Network Server platform provided by Loriot. (http://loriot.io )
Overview of the Connection Process
Connecting thingsHub to Loriot for combo connectivity involves the following main steps:
Loriot Configuration: Performing preliminary tasks within your Loriot Network Server account.
thingsHub Network Connector Creation: Setting up the Loriot Network Connector within your thingsHub tenant.
Loriot Data Forwarding (LoRaWAN): Configuring Loriot to send LoRaWAN data to thingsHub.
Receiving Cellular Data from Devices: Configuring the devices to send data via the cellular network to thingsHub
Let's dive into each step
1. Preliminary Tasks in Loriot:
Before configuring thingsHub, you need to gather some information from your Loriot Network Server dashboard:
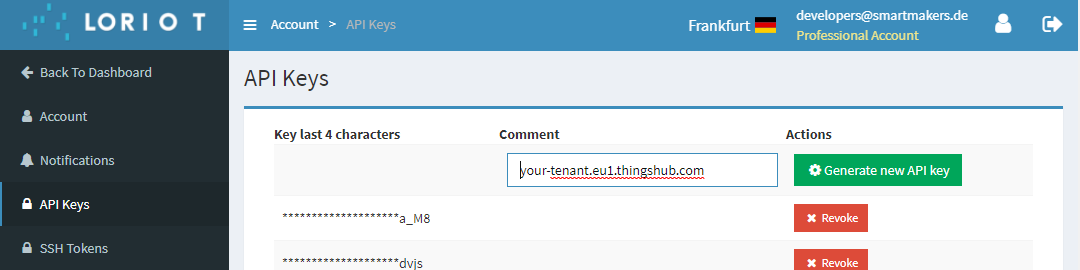
Create a New API Key:
Log in to your Loriot Network Server dashboard (e.g.,
eu1.loriot.io).Navigate to Account > API Keys.
Click on Create new API Key.
Recommendation: Add a descriptive comment to the key, such as your thingsHub tenant's domain name. This will help you identify the key later if you need to manage or revoke it.
Important: Record the API Key that is generated. You will need to enter this in thingsHub.
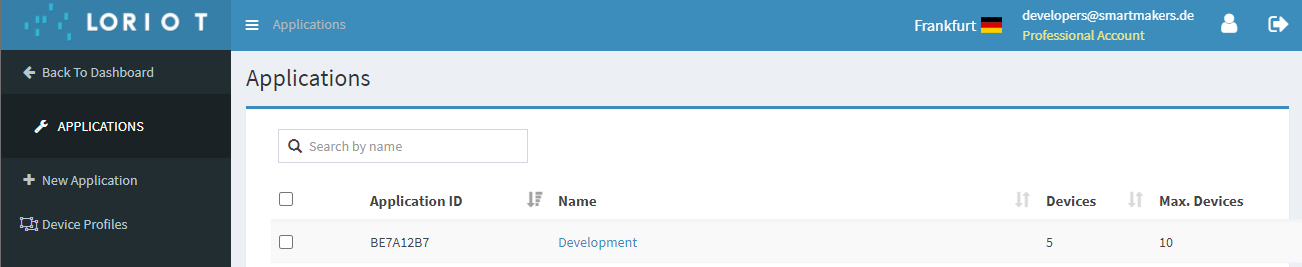
Record the Application ID:
In the Loriot dashboard, go to the Applications section.
Select the specific application that you want to connect to thingsHub.
Note down the Application ID. This ID typically starts with
BEfollowed by six alphanumeric characters. You will need to enter this in thingsHub.
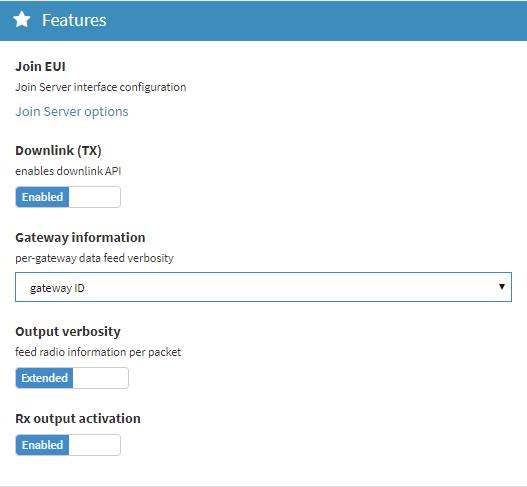
Ensure Output Verbosity is Correct:
While still in the Applications page, verify the Output verbosity setting.
Ensure that the output verbosity is set to include at least the gateway ID. If it's set to "Disabled," thingsHub will not receive any LoRaWAN data.
2. Creating the Network Connector in thingsHub:
Now, let's configure the connection within your thingsHub tenant:
Open your thingsHub tenant in a web browser.
Navigate to Tenant Settings > IoT Network Connections.
Click on the New Connection button.
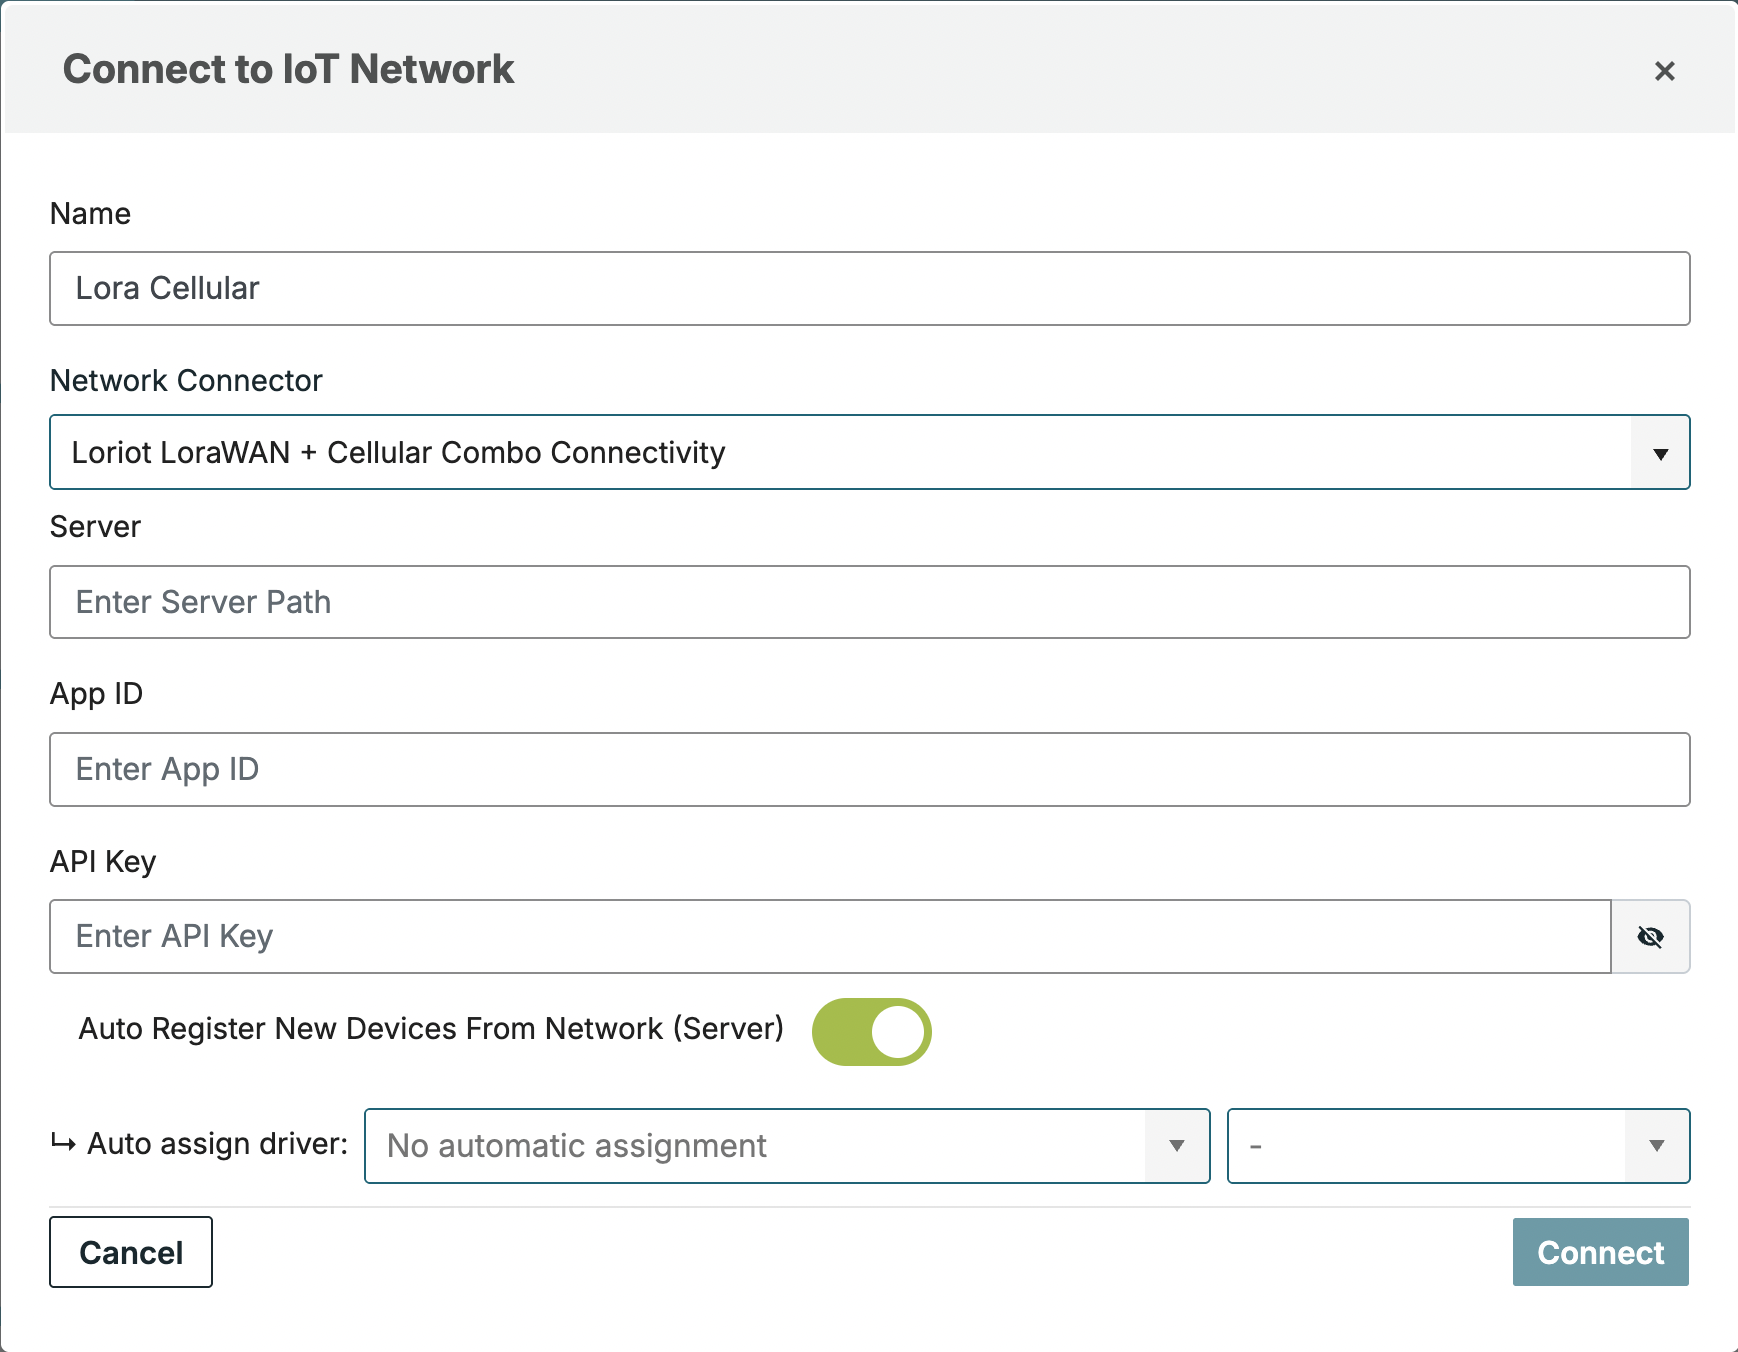
In the "Connect to IoT Network" dialog, fill in the following details based on the parameters described below:
Parameter | Description |
|---|---|
Name | The display name of this Network Connection. |
Network Connector | Choose Loriot LoraWAN + Cellular Combo Connectivity |
Server | The name of the LNS to connect to, e.g., eu1.loriot.io for Loriot’s European community offering. |
App ID | The ID of the Application to connect to. This is a string that looks like BE010203. You have copied from Step 2.c |
API Key | The API key used for authentication. The account with which this API key was generated must have access to the above application. You have copied from Step 1.e Note that the Loriot Network Connector requires an API key, not an application access token. This is because the connector must be able to use the REST-API for registration/de-registration and sending downlinks, not just receive uplinks through the application. |
Auto Register New Devices From Network (Server) | Set this toggle switch to false if you want to manage the device on your network server via the thingsHub. Set this to true if there are already devices registered in this application or if you want to manage the application manually. If this is set to true, any device that’s already registered in the application will show up in the thingsHub automatically, when it sends data for the first time since the creation of the Network Connection. |
Automatically Assign Device Driver | This will let you select the default driver that you want to assign to the devices that are getting auto-registered to the system Note that this option is only available when you enable the automatic registration of the devices |
Click the Connect button.
thingsHub will validate the connection details. If the validation is successful, the new network connector will be created.
3. Configuring Loriot to Forward LoRaWAN Data to thingsHub
Once the network connector is created in thingsHub, you need to configure Loriot to send LoRaWAN data to it:
After successfully creating the network connector in thingsHub, the system will generate a Webhook URL and a Push Token. Copy both of these values and keep them safe.
Go back to your Loriot Network Server dashboard.
Navigate to the specific Application you are connecting to thingsHub.
On the left-hand menu, click on Output.
Click on Add new output and select the HTTP Push output type.
Fill in the following details for the new HTTP Push output:
Name: Give this output a descriptive name (e.g., "thingsHub LoRaWAN").
Target URL for POSTs: Paste the Webhook URL that you copied from thingsHub in Step 3.1.
Authorization (Header Value): Enter the Push Token that you copied from thingsHub in Step 3.1.
4. Receiving Cellular Data from Devices:
To set up data reception with the cellular connection for your combo trackers, please consult with the SmartMakers support.
Conclusion
After completing all the steps above, your thingsHub tenant will be configured to receive data from your devices via both the Loriot LoRaWAN network and the Cellular network through the deployed UDP Forwarder. You should now be able to see data coming into your thingsHub account from both connectivity types.
Cellular ECHO Request and Reply
When the device is connected to the network server via cellular network, there’s a high chance that the network connectivity might be un-available from time to time. In order to seek if the connectivity is still up and running before sending any data, the device will send an echo request periodically and expects an echo reply from the network server as well. If the connection is dead in the middle, the device may try to re-initiate the connectivity by commanding the cellular modem to dial again. So, this echo request-reply is critically important for a healthy communication.
To handle this scenario, a bi-directional Echo Request-Reply, much like a Ping-Pong mechanism is working to keep the connection healthy alive and in check:
The device is sending ECHO request with a random sequence number
thingsHub or the receiver party is responding with an ECHO reply with the same sequence number.
Hence the cellular connection is still alive from device’s POV
This can be observed in the device itself as an echo reply messages
Next steps
You can now connect your devices via this network connection with the thingsHub. You can either add a new device now and connect it during this process, or connect an existing device on the device’s Network tab.